Hey folks, Alex Largent here, owner of Honest Fix Heating, Cooling & Plumbing. With over 20 years of experience keeping homes in Steubenville and across the Ohio Valley comfortable, I’ve seen just about every water heater problem you can imagine. One of the most common calls we get is about the pilot light. It’s a small flame, but when it goes out, it can cause a big headache.
That’s why I’ve put together this complete guide. My goal is to answer every question you have about your water heater’s pilot light—from how to safely light it yourself to figuring out why it keeps going out. We believe in educating our neighbors, so you can feel confident whether you’re tackling a simple fix or calling in a pro.
Quick Answer Box: For When You Need Hot Water NOW
- How do I light my pilot light?
- SAFETY FIRST: If you smell gas, STOP. Leave your home and call your gas company immediately.
- Find the gas control knob near the bottom of the tank. Turn it to “OFF” and wait 10 minutes for any gas to clear.
- Turn the knob to “PILOT.” Press and hold it down.
- While holding the knob, press the red or black igniter button repeatedly until the pilot flame ignites. (For older models, use a long lighter to light the pilot burner manually).
- Continue holding the knob for a full minute after the flame is lit.
- Slowly release the knob. If the flame stays on, turn the knob to “ON” and set your desired temperature.
- Why does my pilot light keep going out? The most common reason is a faulty or dirty thermocouple. This is a safety sensor that shuts off the gas if it doesn’t sense a flame. Other common causes include a draft blowing the flame out, a clogged pilot tube starving the flame of fuel, or a problem with the main gas control valve.
Part 1: Your Water Heater Pilot Light: The Basics for Ohio Valley Homes
Before we dive into fixing things, let’s get on the same page about what this little flame is and what it does. Understanding the basics will make troubleshooting a whole lot easier.
What is a Pilot Light and Why Does My Water Heater Need One?
Think of a pilot light as the “standby” flame for your gas water heater. It’s a small, continuous flame that’s always ready to ignite the main burner—the big ring of fire that does the heavy lifting of heating your water. When your thermostat senses the water in the tank has cooled down, it tells the main gas valve to open. The pilot light is right there to ignite that rush of gas, firing up the main burner and starting the heating cycle.
Its job is twofold: readiness and safety. It ensures that heat is available on demand, and it works with a key safety device called a thermocouple to make sure unburned gas doesn’t fill your home.
Finding the Pilot Light on Your Water Heater (With Diagrams)
Finding the pilot light is usually straightforward. On most tank-style gas water heaters, you’ll find it near the bottom of the unit, behind a small metal access panel.
- Look for the Gas Control Valve: This is the box near the bottom of the tank where the main gas line connects. It will have a knob with settings like “ON,” “OFF,” and “PILOT,” as well as a temperature dial.
- Locate the Access Panel: Directly below or attached to the gas control valve, there will be a small cover, sometimes labeled “Burner Access.” You may need to slide it off or remove a couple of screws.
- Peer Through the Sight Glass: Many modern water heaters have a small, sealed glass window, often called a “pilot light window”. This lets you see the pilot flame without removing any covers. You may need a flashlight to get a good look inside.
Does My Water Heater Have a Pilot Light? (Gas vs. Electric vs. Tankless)
This is a question we get all the time, and it’s a great one because not all water heaters are built the same. The answer depends entirely on what kind of water heater you have in your home.
- Traditional Gas Tank Water Heaters: Yes, the vast majority of these units use a standing pilot light system as described above. If you have a gas line running to a tank in your basement, you almost certainly have a pilot light.
- Electric Water Heaters: No. Electric water heaters do not use gas and therefore do not have a pilot light. They rely on electric heating elements submerged in the water to do the heating.
- Tankless Water Heaters: Almost always no. Modern tankless water heaters, whether gas or electric, use electronic ignition instead of a standing pilot light. This means they create a spark to ignite the gas only when you turn on a hot water tap. This is a major reason they are more energy-efficient—they aren’t burning a small amount of gas 24/7 just to stay ready.
The shift from standing pilots to electronic ignition is one of the biggest advancements in water heater technology. While a pilot light is reliable, it consumes a small but constant amount of gas. By eliminating it, modern units save energy and reduce your utility bills.
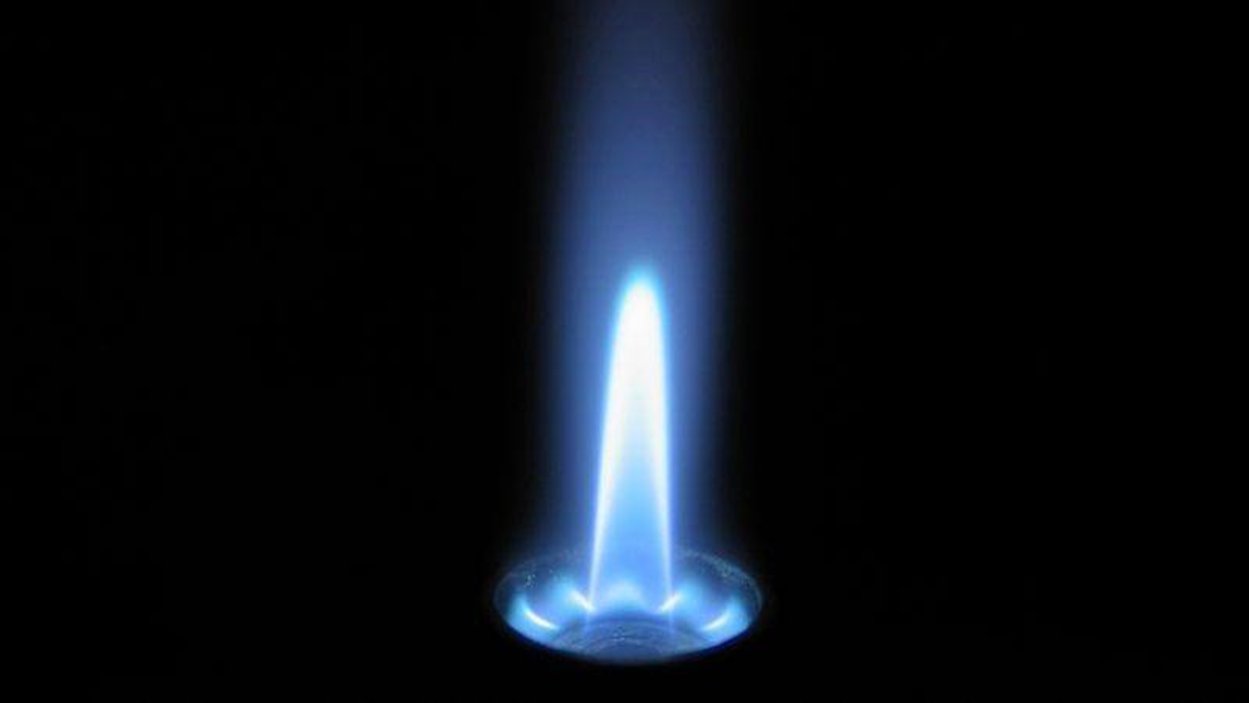
What a Healthy Pilot Light Flame Looks Like: The Blue Flame Rule
When you look at your pilot light, its color and behavior tell you a lot about its health. A healthy, efficient pilot flame should be a strong, steady blue flame, sometimes with a small yellow or orange tip. This indicates that the gas is burning completely and cleanly.
If you see a flame that is mostly yellow, orange, or one that flickers and waves around wildly, it’s a sign of a problem. This usually means there isn’t enough oxygen for complete combustion, often due to dirt or debris clogging the pilot assembly or a draft interfering with the flame. An incorrect flame color can also lead to soot buildup and the production of carbon monoxide.
Use this simple chart to diagnose what you’re seeing.
| Pilot Light Flame Color | What It Means | What to Do |
| Strong, Steady Blue | Healthy and efficient combustion. | Normal operation. No action needed. |
| Mostly Yellow or Orange | Incomplete combustion. Likely a dirty pilot orifice or burner. | This is a problem. Call a professional for cleaning and inspection. |
| Flickering or Wavy Flame | A draft or airflow issue is disturbing the flame. | Check for drafts from nearby windows, doors, or other appliances. If you can’t find the source, call a pro to check for dangerous backdrafting. |
| No Flame | The pilot light is out. | Proceed to the sections on how to safely light your pilot. |
Part 2: How to Safely Light Your Water Heater Pilot Light: A Step-by-Step Guide
Waking up to a cold shower is no one’s idea of a good morning. If your pilot light is out, the good news is that relighting it is often a straightforward process you can do yourself. But because you’re working with natural gas, following safety procedures is absolutely critical.
Safety First: Critical Steps Before You Begin
Let me be crystal clear about this: if you smell gas, STOP immediately. Do not try to light the pilot, do not turn on lights, and do not use your phone. Leave your home right away and call your gas company (like Columbia Gas of Ohio) or 911 from a safe distance outside. The smell of gas, often described as rotten eggs, indicates a leak that needs to be handled by a professional.
If you do not smell gas, you can proceed with the following steps. The most important safety measure is to turn the gas control knob to “OFF” and wait at least 5-10 minutes before you try to light anything. This allows any unburned gas that may have accumulated in the combustion chamber to dissipate safely, preventing a dangerous flare-up when you introduce a flame.
Lighting a Pilot Light with an Igniter Button (The Modern Method)
Most water heaters made in the last 15-20 years have a built-in piezo igniter—a small button that creates a spark, so you don’t need matches or a lighter.
- Set the Temperature to Low: Turn the temperature dial on the gas control valve to its lowest setting or to the “Pilot” setting.
- Turn the Gas Knob to “PILOT”: Align the marker on the gas control knob with the “PILOT” position.
- Press and Hold the Knob: You’ll need to press the control knob in and hold it down. This manually opens the pilot valve to allow gas to flow.
- Press the Igniter Button: While continuing to hold the control knob down, press the red or black igniter button. You should hear a “click” with each press. Press it once per second.
- Look for the Flame: Look through the sight glass. You should see the pilot flame ignite. On many models, a status light on the control valve will also begin to flash.
- Keep Holding for One Minute: This is the step most people miss. You must continue to hold the control knob down for a full 30 to 60 seconds after the flame is lit. This heats up the thermocouple, which is the safety sensor that tells the gas valve it’s safe to stay open.
- Slowly Release the Knob: After a minute, slowly let go of the control knob. The pilot flame should remain lit. If it goes out, wait 10 minutes and repeat the process. It can sometimes take a couple of tries if there’s air in the gas line.
- Turn to “ON” and Set Temperature: Once the pilot stays lit, turn the control knob to the “ON” position. You should hear a “whoosh” as the main burner ignites. Set the temperature dial back to your desired setting (we recommend 120°F for safety and efficiency).
Lighting a Pilot Light Manually without an Igniter (For Older Models)
If you have an older water heater, you may not have an igniter button. The process is nearly identical, but you’ll provide the flame yourself.
- Follow Steps 1-3 above: Turn the temperature down, turn the gas knob to “PILOT,” and press and hold the knob down.
- Apply a Flame: Use a long-reach barbecue lighter or a long fireplace match to reach into the burner chamber through the access opening. Place the flame right at the end of the pilot tube. The pilot should ignite immediately.
- Follow Steps 6-8 above: Continue to hold the control knob down for a full minute to heat the thermocouple, then slowly release it. Once the pilot stays lit, turn the knob to “ON” and set the temperature.
Brand-Specific Lighting Instructions
While the general process is similar for most brands, the knobs, buttons, and indicator lights can look a little different. As a Rheem Pro Partner, I know the little details can make all the difference. Here are specific instructions for the brands we see most often around Steubenville.
How to Light a Rheem Water Heater Pilot
Rheem water heaters typically have a very user-friendly control valve.
- Turn the black gas knob to “PILOT.”
- Press and hold the knob down.
- Repeatedly press the sparker button until the pilot lights.
- Look for the small blue status light on the control valve to start flashing. One flash every few seconds is normal operation.
- Continue holding the knob for about 30-60 seconds after the light starts flashing.
- Release the knob, turn it to your desired temperature setting, and replace the cover.
How to Light a Bradford White Water Heater Pilot
Bradford White heaters often use their ICON System® gas valve.
- Turn the large dial so the arrow points to “PILOT.”
- Press and hold the dial in.
- Press the piezo igniter button repeatedly.
- Look for a green status light to start blinking. This indicates the pilot is lit and the system is functioning correctly.
- Keep holding the dial in for about a minute after the green light appears.
- Release the dial, turn it to your desired temperature, and listen for the main burner to ignite.
How to Light an A.O. Smith Water Heater Pilot
A.O. Smith models are also very common and follow a similar procedure.
- Turn the gas knob to the “OFF” position and wait 10 minutes.
- Turn the knob to “PILOT.”
- Press and hold the knob in for at least 30 seconds.
- While holding, press the electronic ignition button several times.
- Look for a blinking status light on the control valve to confirm the pilot is lit.
- Continue holding the knob for another 20-30 seconds, then release.
- Turn the knob to “ON” and set your temperature.
How to Light a Honeywell Gas Valve Pilot
Many different water heater brands (including some Rheem, A.O. Smith, and Bradford White models) use a gas control valve made by Honeywell. If your valve says “Honeywell” on it, these are the general steps.
- Turn the control knob to “PILOT.”
- Press and hold the knob.
- Press the igniter button until the pilot flame appears in the sight glass.
- Continue to hold the knob for a full minute to heat the thermocouple.
- Release the knob. If the flame stays lit, turn the knob to “ON.” If you see a blinking status light, the number of blinks can be a diagnostic code to tell you what’s wrong.
Part 3: Troubleshooting the Top 3 Pilot Light Problems in Steubenville
So you’ve successfully lit the pilot, but it won’t stay lit. Or maybe it won’t light at all. This is where my 20 years of experience in the Ohio Valley really comes into play. Let’s walk through the most common problems and what causes them.
Problem 1: My Pilot Light Won’t Stay Lit (“Keeps Going Out”)
This is, without a doubt, the most frequent pilot light issue we encounter. It’s incredibly frustrating because you can get the flame to light, but the second you let go of the button, it dies. This almost always means the safety system is doing its job and shutting off the gas, but it’s doing it for the wrong reason.
The pilot light going out is a symptom, not the root cause. The real issue lies in the communication between the flame, the sensor (thermocouple), and the control valve (the brain). Something is breaking that chain.
Top 5 Reasons This Happens in the Ohio Valley
- A Faulty or Dirty Thermocouple: This is the number one culprit. The thermocouple is a small copper probe that sits in the pilot flame. It generates a tiny electrical current (millivolts) when heated. This current tells the gas valve, “Hey, the pilot is lit, it’s safe to keep the gas flowing.” If the thermocouple is dirty, bent out of the flame, or has simply worn out, it can’t generate enough current. The gas valve doesn’t get the “all clear” signal and shuts the gas off as a safety precaution.
- Drafts or Backdrafting: Many homes in Steubenville, Weirton, and the surrounding areas have older construction or are situated on hillsides, making them prone to drafts. A strong gust of wind down the flue pipe or even the furnace kicking on can be enough to blow the pilot flame away from the thermocouple or extinguish it completely. This is not just an annoyance; it can be a sign of a dangerous venting problem.
- A Dirty Pilot Orifice/Tube: The pilot tube is a very thin line that supplies gas to the pilot flame. Over time, dust, debris, or even small spiders can clog this tube. This results in a weak, flickering, or yellow flame that isn’t strong enough to properly heat the thermocouple, causing the system to shut down.
- Clogged Air Intake & Sediment Buildup: The water here in the Ohio Valley, sourced from the river, is quite hard. This means it’s full of minerals that settle at the bottom of your water heater tank over time, creating a layer of sediment. This sediment can cause the tank to overheat, which can trip a thermal cutoff switch on newer models, shutting down the entire system, including the pilot. The sediment can also clog the flame arrestor screen at the bottom of the heater, starving the burner and pilot of the air they need for combustion.
- A Failing Gas Control Valve: The gas valve is the command center. Inside it is a small electromagnet (a solenoid) that holds the pilot valve open as long as it receives a signal from the thermocouple. If this magnet weakens with age, it may not be able to hold the valve open, even with a perfectly good thermocouple.
Homeowner Self-Diagnostics
Before calling us, here are a few safe things you can check:
- Check the Flame Color: Is it a strong blue or a weak yellow? A yellow flame points to a dirty pilot orifice.
- Perform a Draft Test: Carefully light a match or incense stick and hold it near the draft hood (the cone-shaped vent on top of the tank) while the main burner is running. The smoke should be pulled up into the vent. If it blows back into the room, you have a dangerous backdrafting problem and should call a professional immediately.
- Inspect the Air Intake: Look at the vents or screen at the bottom of your water heater. Are they clogged with dust, lint, or pet hair? Carefully vacuuming this area can improve airflow.
How to Clean a Thermocouple (DIY With Caution)
If you’re comfortable with basic tools, cleaning the thermocouple can sometimes solve the “won’t stay lit” problem.
- Turn off the gas supply at the shut-off valve on the pipe leading to the water heater.
- Remove the burner access panel.
- Disconnect the thermocouple, pilot tube, and main burner tube from the gas control valve. This usually requires a few different-sized wrenches. Keep track of which tube goes where.
- Slide the entire burner assembly out of the water heater.
- The thermocouple is the copper rod positioned next to the pilot. Gently scrub the tip with fine-grit sandpaper or the abrasive side of a sponge to remove any carbon buildup or corrosion. Be gentle; you don’t want to damage it.
- Wipe it clean with a dry cloth.
- Slide the burner assembly back into place, reconnect the three tubes to the gas valve, and tighten the nuts securely but do not overtighten.
- Turn the gas back on, check for leaks with soapy water, and try relighting the pilot.
Problem 2: My Pilot Light Won’t Light at All
You follow all the steps, you press the igniter, and… nothing. No flame, no spark, no action. I remember a call out to a home in Wintersville where a family had just moved in. They had no hot water and couldn’t get the pilot to light. After checking everything, I found the main gas shut-off valve behind the water heater had been bumped and was partially closed. A simple turn of the handle and they were back in business. It’s often something simple.
Top 5 Reasons for Ignition Failure
- No Gas Flow: Just like my story, the main gas valve to the heater might be turned off, or there could be an issue with your gas service from the utility company.
- Broken Igniter: The piezo igniter can wear out. If you press the button and don’t hear a distinct “click,” or if you can’t see a spark through the sight glass, the igniter itself is likely broken.
- Clogged Pilot Orifice: If the pilot tube is completely blocked, no gas can get to the burner to be ignited.
- Tripped Safety Switch: Newer sealed-combustion water heaters have a thermal cutoff switch or a flammable vapor sensor near the base. If the switch trips due to overheating (often from a clogged air intake) or detects flammable vapors (like from paint or gasoline stored nearby), it will shut off all gas to the unit and will not allow the pilot to light until it’s reset or replaced.
- Air in the Gas Line: If the gas has been turned off for a while for any reason, it can take some time to purge the air out of the line. You may need to hold the pilot knob down for longer than a minute and click the igniter many times before gas finally reaches the pilot.
Problem 3: The Pilot is On, But I Have No Hot Water
This is one of the most confusing situations for a homeowner. You look through the sight glass, you see the pilot flame burning happily, but your water is still ice cold. What gives?
Remember, the pilot light’s only job is to light the main burner. If the main burner never fires up, the water in the tank will never get hot.
Top 4 Causes
- Faulty Thermostat or Gas Control Valve: The thermostat is what senses the water temperature. If it’s broken, it will never tell the main gas valve to open. Alternatively, the thermostat could be working fine, but the main valve in the gas control unit is stuck or has failed and won’t open to let gas flow to the burner.
- Severe Sediment Buildup: As I mentioned, the hard water in our area is tough on water heaters. A thick layer of mineral sediment at the bottom of the tank can act as a barrier, insulating the thermostat from the water. The pilot light and burner might heat the sediment and the bottom of the tank, but that heat never efficiently transfers to the water. The thermostat gets a false reading that the water is hot and shuts the burner off prematurely. You’ll often hear popping or rumbling noises in this case.
- Bad Main Burner: The burner itself can become clogged with rust or soot, preventing it from lighting properly even when gas is flowing to it.
- Broken Dip Tube: This is a less common but possible cause. The dip tube is a plastic pipe that directs cold incoming water to the bottom of the tank to be heated. If it breaks off, cold water dumps in at the top, mixing immediately with the hot water you’re trying to use. The result is lukewarm water at the tap, even if the pilot and burner are working perfectly.
Troubleshooting Quick-Reference Chart
| Symptom | Likely Cause | Safe DIY Check | When to Call Honest Fix |
| Pilot won’t stay lit | Dirty/Faulty Thermocouple, Drafts, Clogged Pilot Tube | Check flame color, perform draft test, clean air intake screen. | If DIY cleaning doesn’t work or you suspect a draft/venting issue. |
| Pilot won’t light at all | No Gas, Broken Igniter, Clogged Pilot Tube | Check main gas valve, listen for igniter “click,” look for spark. | If gas is on and igniter won’t spark, or if you suspect a clog. |
| Pilot is on, no hot water | Faulty Gas Valve/Thermostat, Sediment Buildup | Turn thermostat up to see if burner ignites. Listen for popping noises. | If burner never ignites or you hear rumbling sounds. |
| Water is lukewarm | Broken Dip Tube, Sediment Buildup | Listen for popping sounds. Check water temp at the heater’s drain valve. | If water is hot at the tank but lukewarm at the tap. |
| Hissing/Popping Noises | Sediment Buildup | Listen to the tank while it’s heating. | As soon as you hear these noises, to prevent tank damage. |
Part 4: Professional Service & Honest Costs in the Steubenville Area
Sometimes, a problem is beyond a simple DIY fix. When you’re dealing with gas appliances, safety has to be the top priority. Here’s an honest look at when to call a pro and what you can expect.
The Honest Fix No-Surprise Pricing Promise
Here at Honest Fix, we put our name on the line. We believe you have a right to know what a repair will cost before we start the work. When you call us for a water heater issue, we’ll perform a thorough diagnostic, identify the problem, and give you an exact, upfront price for the repair. No hidden fees, no last-minute charges, just honest work at an honest price. That’s our promise to you.
DIY vs. Professional Pilot Light Repairs
Knowing your limits is key. Some tasks are perfectly safe for a handy homeowner, while others carry significant risks if not done correctly.
| Task | Honest Fix Recommendation | Why? |
| Checking for drafts | Safe for DIY | A simple, non-invasive test using smoke or a match. |
| Cleaning a thermocouple | DIY with Caution | Requires shutting off gas and disassembling parts. Follow steps carefully. |
| Relighting the pilot | Safe for DIY | Follow the manufacturer’s instructions and safety precautions exactly. |
| Replacing a thermocouple | Call a Pro – High Risk | Involves disconnecting and reconnecting gas lines. A leak can be dangerous. |
| Replacing a pilot assembly | Call a Pro – High Risk | More complex than a thermocouple; requires specialized knowledge of gas components. |
| Replacing a gas control valve | Call a Pro – High Risk | This is the heart of the system. An improper installation is a major safety hazard. |
Export to Sheets
While replacing a thermocouple might seem simple, the risk of creating a gas leak by not tightening a fitting correctly is very real. For your family’s safety, any repair that involves disconnecting gas lines is best left to a licensed and insured professional.
Understanding Repair Costs: What to Expect in the Steubenville Area
We believe in transparency, so let’s talk about costs. While every situation is different, here are some typical price ranges for professional water heater repairs in our area. These are based on national averages and our local experience.
- Service Call / Pilot Relighting: If it’s just a matter of relighting a tricky pilot and a quick inspection, you can expect a service call fee, typically between $75 and $175.
- Thermocouple Replacement: This is one of the most common repairs. The part is inexpensive, but with labor, the total cost is usually $100 to $325.
- Pilot Assembly Replacement: This is a more involved repair and can range from $150 to $400.
- Gas Control Valve/Thermostat Replacement: This is a major component, and replacement costs typically fall between $150 and $550, depending on the model.
Pilot Assembly & Thermocouple Replacement: What’s Involved?
When you call a professional to replace a part like the pilot assembly, you’re paying for more than just the component itself. You’re paying for expertise, safety, and peace of mind.
A full pilot assembly replacement kit typically includes the pilot burner, the thermocouple, the igniter, and the gas tubing that connects them all, along with new gaskets and screws. A technician will:
- Safely shut down the water heater and turn off the gas supply.
- Disconnect the old assembly from the gas control valve.
- Remove the entire burner assembly from the combustion chamber.
- Carefully uninstall the old pilot assembly and install the new one, ensuring proper alignment of the thermocouple and igniter.
- Reinstall the burner assembly with a new gasket to ensure a proper seal.
- Reconnect all gas lines and wires to the control valve.
- Turn the gas supply back on and meticulously test every connection for leaks using a gas detector.
- Relight the pilot and test the full operation of the water heater to ensure the main burner ignites and shuts off correctly.
Why 20 Years of Local Experience Matters in the Ohio Valley
Working in Steubenville, Wintersville, Weirton, and the surrounding towns for two decades, I’ve learned that our local conditions matter. I know the issues that pop up in the older homes in LaBelle, and I understand how the hard river water affects tanks in Pleasant Heights. This local knowledge isn’t something you can learn from a manual; it comes from years of hands-on experience solving the unique problems our community faces. When you call Honest Fix, you’re not just getting a technician; you’re getting a neighbor who understands your home and is committed to getting the job done right.
Part 5: Your Complete Water Heater Pilot Light FAQ
Here are answers to some of the most common questions we hear from homeowners about their pilot lights.
Safety Questions
- Is it dangerous if the pilot light goes out? Not immediately. Gas water heaters are equipped with a safety device (the thermocouple) that automatically shuts off the gas supply to the pilot and main burner if it doesn’t sense a flame. This prevents unburned gas from filling your home. However, it does mean you have no hot water, and it indicates an underlying problem that needs to be addressed.
- What do I do if I smell gas? This is an emergency. Do not use any phones, light switches, or lighters. Leave your house immediately, taking pets with you. From a safe distance (like a neighbor’s house), call your gas utility’s emergency line or 911.
- Can a draft really blow out my pilot light? Absolutely. A strong downdraft through your chimney or flue on a windy day, or even negative air pressure created when a furnace or large exhaust fan kicks on, can be strong enough to extinguish the small pilot flame.
Component & Function Questions
- How long does a thermocouple last? A thermocouple typically lasts about 10 years, but this can vary. Factors like sediment buildup causing overheating can shorten its lifespan.
- What is a thermopile? A thermopile is like a heavy-duty thermocouple. It’s a bundle of thermocouples that generates a higher voltage (around 750 millivolts compared to a thermocouple’s 30 millivolts). It’s often used in systems that power the entire gas valve without needing external electricity.
- What does the blinking light on my gas valve mean? This is a diagnostic code. The number of blinks corresponds to a specific issue. For example, on many Honeywell valves, 7 flashes indicates a gas control valve failure, while 4 flashes means the high-temperature limit has been exceeded. On Bradford White ICON systems, a blinking green light is normal, but other patterns indicate specific faults. Always consult your owner’s manual or call a pro to interpret these codes.
Cost & Repair Questions
- Is it cheaper to repair or replace my water heater? It depends on the age of the heater and the cost of the repair. If your water heater is over 10-12 years old and needs a major repair like a new gas valve, it often makes more financial sense to invest that money in a new, more efficient unit. For a younger heater with a simple thermocouple issue, a repair is usually the best option.
- What is covered under a water heater warranty? Manufacturer warranties typically cover the tank against leaks for a set period (e.g., 6 or 12 years) and parts (like the gas valve or thermocouple) for a shorter period (often 1-6 years). Labor is usually not covered. Importantly, most warranties can be voided if repairs are not performed by a licensed professional or if the unit isn’t maintained properly (like regular flushing).
- Who do I call to fix a pilot light? You should call a licensed and insured plumber or a qualified HVAC technician. At Honest Fix, we are experts in both heating and plumbing, so we’ve got you covered.
Specific Scenarios
- My water heater got wet, and now the pilot won’t light. What should I do? If the burner assembly and controls got wet from a basement flood or a leak, do not attempt to light it. The electronic components of the gas valve and safety sensors are very sensitive and can be permanently damaged by water. The entire control unit and burner assembly will likely need to be replaced by a professional.
- Why does my pilot light only go out on windy days? This is a classic sign of a backdrafting problem in your flue or chimney. Wind currents are creating pressure that blows down the vent and extinguishes the flame. This is a serious safety concern that needs to be inspected by a professional.
- Can I manually light a water heater that has an electronic igniter? If the igniter button is broken, it is sometimes possible to light the pilot manually with a long lighter, but it can be difficult and requires removing access panels. It’s safer and more reliable to have the faulty igniter assembly replaced.
Maintenance Questions
- How often should I have my water heater inspected? We recommend having your water heater professionally inspected and flushed annually. This is especially important in the Ohio Valley due to our hard water.
- How does flushing my tank help the pilot light? Flushing removes the mineral sediment that builds up at the bottom of the tank. This prevents the tank from overheating, which can trip safety switches that shut off the pilot light. It also allows the thermostat to get an accurate temperature reading, ensuring the main burner operates correctly and efficiently.
Part 6: Your Local Ohio Valley Water Heater & HVAC Experts
This guide was created to give you the confidence to handle common pilot light issues safely. From relighting the pilot to understanding why it keeps going out, knowing how your water heater works is the first step to a reliable hot water supply. However, some jobs, especially those involving gas lines, are always best left to a trained professional.
At Honest Fix Heating, Cooling & Plumbing, my team and I are proud to serve our neighbors across the Ohio Valley. Our commitment to honest, expert service extends beyond water heaters. We are your local experts for all your home comfort needs.
We provide top-tier HVAC and water heater services to the following communities:
- Steubenville, OH: Furnace repair, AC installation, and emergency water heater service.
- Wintersville, OH: Air conditioning repair, heating services, and water heater replacement.
- Toronto, OH: HVAC maintenance, furnace installation, and water heater repair.
- Mingo Junction, OH: AC repair, heating system check-ups, and water heater services.
- Burgettstown, PA: Furnace and air conditioner service, and water heater expertise.
- Weirton, WV: Complete HVAC solutions, including heating and cooling repair and installation.
When you need a trusted partner for your home’s essential systems, you can count on our 20 years of local experience. For an honest assessment and reliable service, give Honest Fix a call.