Part 1: The Fundamentals of Draining Your Water Heater
Why, When, and How Often to Drain Your Water Heater: An Honest Fix Guide
Hello, I’m Alex Largent. For the last 20 years, I’ve been a plumber and HVAC pro right here in the Ohio Valley, and as the owner of Honest Fix, I’ve seen just about every water heater problem you can imagine. One of the most common questions I get is, “Do I really need to drain my water heater?” You’ll find a dozen different answers online, and it’s easy to get confused. Some say it’s essential, others say don’t bother.
The truth is, it depends. My promise to you is to cut through that noise and give you a straight, honest answer based on two decades of hands-on experience. In this guide, we’ll cover the real reasons why draining matters, when you absolutely should do it, and—just as important—when you might be better off leaving it alone. We’ll give you the knowledge to make the right call for your home, your equipment, and your wallet. No games, no upsells, just the information you need to get the job done right.
The Core Reasons for Draining (The “Why”)
Draining your water heater isn’t just busywork; it’s preventative maintenance that addresses a core problem that affects every single tank-style water heater: sediment.
Fighting Sediment Buildup
The water that comes into your home, especially the harder water we often see around here, is full of naturally occurring minerals like calcium and magnesium. When that water is heated inside your tank, these minerals separate and settle at the bottom, forming a layer of gritty, sand-like sediment. Over months and years, this layer can become thick and dense, causing a whole host of problems.
Improving Efficiency & Lowering Bills
Your water heater’s job is to transfer heat into the water. In a gas heater, the burner is at the bottom. In an electric heater, one of the heating elements is at the bottom. That layer of sediment builds up right on top of the heat source, acting like a layer of insulation. This forces the burner or element to run longer and work harder to heat the water through that sludge. This wasted energy translates directly into higher gas or electric bills. By flushing that sediment out, you allow the heat to transfer directly to the water, making the unit run more efficiently and saving you money.
Extending Equipment Lifespan
That constant overheating caused by the sediment layer doesn’t just waste energy; it actively damages your water heater. The excess heat can cause the tank’s protective inner glass lining to crack and can weaken the steel tank itself, leading to corrosion and, eventually, a leak. For electric water heaters, the problem is even more direct. When the lower heating element is completely buried in sediment, it can’t transfer its heat to the water. This causes the element to overheat and burn out, leaving you with lukewarm showers and a repair bill. Regular draining removes this damaging sediment, preventing these issues and helping your water heater last its full intended lifespan.
Quieting a Noisy Water Heater
If you’ve ever heard a popping, rumbling, or banging sound coming from your water heater, you’re hearing the effects of sediment buildup. This noise, which plumbers call “kettling,” happens when water gets trapped underneath the sediment layer. As the burner or element heats that trapped water, it turns to steam and violently bubbles up through the sediment, creating a sound just like a popcorn machine. While the noise itself isn’t dangerous, it’s a clear sign that a thick layer of sediment is causing your unit to overheat and run inefficiently. Draining and flushing the tank is the number one solution to stop the noise and protect the heater.
The Great Debate: To Drain or Not to Drain?
This is where homeowners get confused, and for good reason. If you read your water heater’s manual or most articles online, they’ll tell you to drain your tank once a year, no questions asked. It’s presented as a universal rule. However, if you talk to a lot of seasoned plumbers, you might get a different story. Many will tell you they’d never touch the drain valve on a 12-year-old water heater that’s never been maintained.
So, who’s right? They both are. The advice changes based on one critical factor: the age and maintenance history of your specific water heater.
On a newer tank, or one that has been drained regularly, flushing out the sediment is purely beneficial. It keeps the tank clean and efficient. But on an old, neglected tank, that thick layer of sediment might be doing more than just causing problems. Over years of overheating and corrosion, tiny pinhole leaks may have formed in the tank’s lining. In these cases, the sediment can actually act like a plug, holding the water back. If you suddenly flush all of that sediment out, you can expose those leaks, and the tank will start dripping or even fail completely within days.
I saw this happen once at a home over in Wintersville. The homeowner had a 15-year-old tank and had just read an article about maintenance. He drained it for the first time ever, and a week later, I was there replacing a leaking tank. The flush didn’t cause the failure, but it revealed a problem that was already there.
Deciding whether to drain an older tank is a calculated risk. To make it simple, I’ve put together a table to help you make an informed decision.
| Tank Age | Maintenance History | Recommendation | Risk Level |
| 0–5 Years | Drained Annually or Never Drained | Drain & Flush Annually. | Low: This is ideal preventative maintenance that will extend the life of your unit. |
| 5–10 Years | Drained Annually | Continue Annual Draining. | Low: You are maintaining the unit correctly and preventing major sediment buildup. |
| 5–10 Years | Never Drained | Drain with Caution. | Medium: There’s a small chance of exposing pre-existing corrosion or pinhole leaks. Proceed, but be prepared for the possibility that the tank may start leaking afterward. |
| 10+ Years | Never Drained | Do Not Drain. Consult a Pro. | High: The sediment layer may be acting as a seal. Flushing will very likely cause the tank to fail. It’s better to leave it be and start budgeting for a replacement. |
Export to Sheets
How Often Should You Drain? The Honest Fix Frequency Guide
If your water heater is in the “safe to drain” category, the next question is how often to do it. The answer depends almost entirely on the hardness of your water. Hard water has a higher concentration of dissolved minerals, which means sediment builds up much faster.
Here in the Ohio Valley, water hardness can vary, but it’s often on the moderate-to-hard side. This makes regular flushing more important for us than for folks in areas with naturally soft water.
Here’s a simple guide to follow:
| Water Hardness | Recommended Frequency |
| Soft Water | Every 18–24 months |
| Moderate/Average Hardness | Every 12 months |
| Very Hard Water | Every 6 months |
Export to Sheets
If you’re not sure about your water hardness, a simple annual flush is a great rule of thumb for keeping your water heater in top shape.
Part 2: The Complete Step-by-Step Draining & Flushing Guides
How to Drain & Flush a Gas Water Heater: The Professional’s Method
Alright, let’s get to work. Draining a gas water heater is a straightforward job if you’re prepared and follow the steps in order. In my 20 years, I’ve seen simple jobs go wrong because of poor prep, so let’s start there.
Safety First Checklist
Before you even touch the tank, gather your tools and think about safety.
- Tools Needed: You’ll need a standard garden hose (at least 10-15 feet), a flat-head screwdriver or a special water heater drain valve key, a pair of pliers or an adjustable wrench, a bucket to catch any initial drips, and a good pair of protective gloves and safety goggles. The water coming out can be scalding, so don’t skip the safety gear.
- Step 1: Turn Off the Gas. Look for the gas control valve on the front of your water heater. It will have a knob with settings like “ON,” “OFF,” and “PILOT.” Turn the knob to the “PILOT” setting. This stops the main burner from firing while you work but keeps the pilot light lit, which makes restarting the heater much easier. Do not turn it all the way to “OFF” unless you are comfortable and familiar with the process of relighting a pilot light.
- Step 2: Turn Off the Cold Water Supply. Look at the pipes on top of your water heater. One will be the hot water outlet (usually marked red) and the other will be the cold water inlet (usually marked with a blue handle or ring). Find the shutoff valve on the cold water inlet pipe and turn it clockwise until it stops. This prevents new water from entering the tank as you drain it.
The Draining Process
- Step 3: Let the Water Cool (Optional but Recommended). The water inside your tank is dangerously hot, often 120°F or more. For your safety, it’s best to wait several hours or even overnight for the water to cool down before draining. If you’re in a hurry, you can speed up the cooling process by running a load of laundry on hot or taking a hot shower to use up the heated water in the tank.
- Step 4: Attach the Garden Hose. Find the drain valve, which looks like a regular hose spigot, near the bottom of the water heater tank. Screw your garden hose onto the valve and make sure it’s snug. Run the other end of the hose to a safe drainage location, like a floor drain, a bathtub, or outside on the driveway. Remember, you’re about to drain 40 or 50 gallons of water, so make sure the area can handle it.
- Step 5: Let Air In. This is a critical step that many people miss. To drain properly, air needs to get into the tank to replace the water coming out; otherwise, a vacuum will form and stop the flow. You have two options:
- Method A (Safest & Recommended): Go to a sink or bathtub inside your house (preferably on a floor above the water heater, if possible) and open the hot water faucet. You’ll hear some sputtering, and then air will be able to enter the plumbing and flow back to the tank, allowing it to drain smoothly.
- Method B (Use with Caution): You can also open the Temperature and Pressure (T&P) Relief Valve on the side or top of the tank by lifting its lever. However, I advise against this on older tanks. These valves are designed for emergencies, and if they haven’t been operated in years, the spring-loaded seal can get stuck or fail to reseat properly, causing a persistent leak after you’re done. The Honest Fix recommendation is to always use Method A. It’s safer and won’t create a new problem.
- Step 6: Open the Drain Valve. Using your flathead screwdriver or the valve handle, turn the valve counter-clockwise to open it. The water should begin to flow out through the hose. Don’t be surprised if it’s slow at first, especially if there’s a lot of sediment.
The Flushing Process (The “Honest Fix” Difference)
A simple drain gets most of the water out, but it leaves the heaviest sediment sitting at the bottom. A true flush is what cleans the tank.
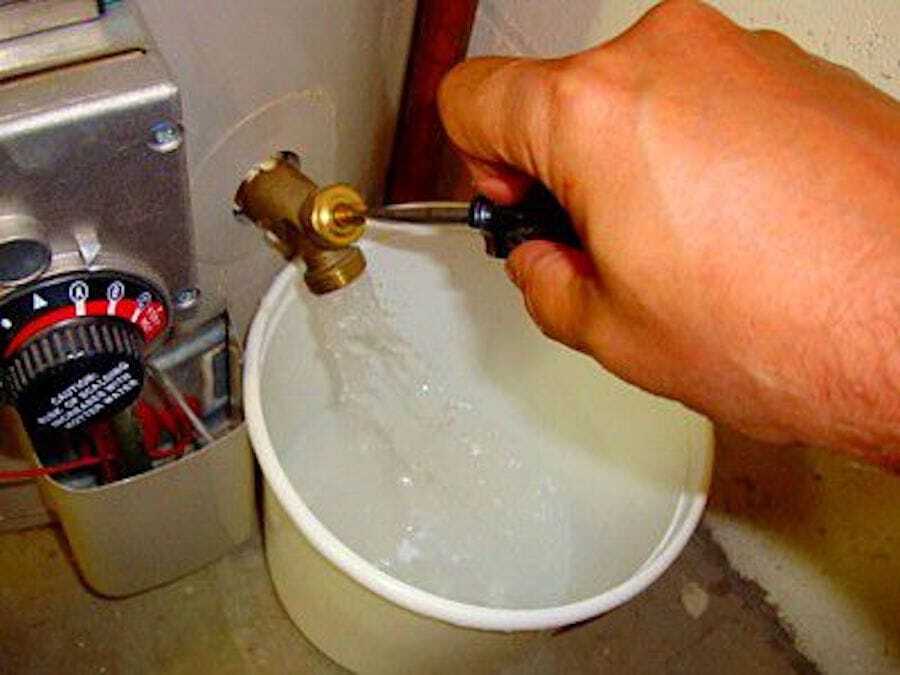
- Step 7: Flush the Sediment. After the tank has completely drained, go back to the cold water supply valve you closed in Step 2. With the drain valve still open, quickly open the cold water valve for about 10-15 seconds, then close it again. Do this a few times. This sends a blast of fresh water into the bottom of the tank, stirring up the packed-down sediment and forcing it out through the drain hose. Watch the water coming out of the hose. At first, it might be cloudy, rusty, or have visible particles. Keep repeating the flushing process until the water runs clear. This is the single most important step for effective cleaning.
Refilling and Relighting
- Step 8: Close Everything Up. Once the water runs clear and you’re done flushing, securely close the drain valve by turning it clockwise. Remove your garden hose. Go back to the sink or tub and close the hot water faucet you opened earlier.
- Step 9: Refill the Tank. Go back to the cold water supply valve on top of the tank and slowly turn it counter-clockwise to open it. You should hear water begin to fill the tank.
- Step 10: Purge the Air. This is another critical step. Leave the cold water supply on and go back to the hot water faucet you used before. Turn it on full blast. The water will sputter and spit as all the air is pushed out of the tank and pipes. Let it run until you have a full, steady stream of water for at least one minute. This confirms the tank is completely full of water. Now you can turn the faucet off. Never, ever turn on the heat source before the tank is 100% full. Doing so will damage the unit.
- Step 11: Restore Heat. Go back to the water heater and turn the gas control knob from the “PILOT” position back to its original temperature setting. The main burner should ignite within a few moments. You should have hot water again in about 30-60 minutes.
How to Drain & Flush an Electric Water Heater: A Safe and Simple Guide
Draining an electric water heater follows many of the same steps as a gas model, but the safety precautions are different and absolutely non-negotiable. Getting this wrong can instantly ruin your water heater.
Safety First: The Golden Rule for Electric Heaters
The number one, most important rule is to turn off the power at the circuit breaker before you do anything else. Find your home’s main electrical panel, locate the breaker labeled “Water Heater” (it’s often a double-pole breaker), and flip it to the “OFF” position.
Why is this so important? Electric water heaters have heating elements inside the tank. If you drain the tank while the power is still on, those elements will be exposed to air instead of water. They will overheat and burn out in a matter of seconds—a mistake called “dry firing.” This will destroy the elements and require a costly repair. So, I’ll say it again:
shut off the breaker first.
Draining and Flushing Process
Once the power is off, the process is nearly identical to the gas water heater guide:
- Tools Needed: Same as the gas model: garden hose, screwdriver/key, pliers, bucket, and safety gear.
- Step 1: Turn Off Power. (Already covered, but it’s worth repeating!)
- Step 2: Turn Off Cold Water Supply. Turn the valve on the cold water inlet pipe clockwise until it stops.
- Step 3: Let the Water Cool. This is still highly recommended for safety.
- Step 4: Attach Garden Hose. Connect the hose to the drain valve at the bottom of the tank and run it to a safe drain.
- Step 5: Let Air In. Open a hot water faucet in a nearby sink or tub to prevent a vacuum lock.
- Step 6: Open Drain Valve. Turn the valve counter-clockwise to begin draining.
- Step 7: Flush the Sediment. Once the tank is empty, use short bursts from the cold water supply valve to stir up and flush out sediment until the water runs clear.
Refilling and Restoring Power
This is the other critical point where electric models differ.
- Step 8: Close Everything Up. Close the drain valve tightly, remove the hose, and close the hot water faucet.
- Step 9: Refill the Tank. Slowly open the cold water supply valve to let the tank fill.
- Step 10: Purge ALL the Air. Go back to the hot water faucet and turn it on. Let it run until all the sputtering stops and you have a solid, uninterrupted stream of water for at least a full minute. This is your proof that the tank is completely full and the heating elements are safely submerged.
- Step 11: Restore Power. Only after you are 100% certain the tank is full should you go back to the electrical panel and flip the circuit breaker back to the “ON” position. Your water heater will begin to heat the new tank of water, which can take an hour or two.
How to Flush a Tankless Water Heater (Descaling)
Tankless water heaters are a different animal. Since they don’t have a storage tank, they don’t collect sediment in the same way. However, the hard water minerals that cause sediment in a tank heater can build up as scale inside the narrow pipes and heat exchanger of a tankless unit. This scale restricts water flow and reduces efficiency.
So, for a tankless unit, we don’t “drain” it; we “flush” or “descale” it by circulating a cleaning solution through it to dissolve the mineral buildup. Most manufacturers recommend doing this about once a year.
Tools & Solutions
This job requires a few specific items you won’t need for a tank heater. You can often buy these as a kit.
- A small submersible utility pump
- A set of two hoses (standard washing machine hoses work perfectly)
- A 5-gallon bucket
- 2 to 3 gallons of undiluted white vinegar or a commercial descaling solution
Step-by-Step Descaling Guide
- Power Down: Turn off the power to the unit at the circuit breaker. If it’s a gas model, turn off the gas supply line valve as well.
- Isolate the Unit: Your tankless heater should have been installed with a set of service valves (also called isolation valves). These usually have a red handle for the hot side, a blue handle for the cold side, and smaller T-shaped handles on the purge ports. Turn the main red and blue valve handles perpendicular to the pipe to shut off water flow to and from the unit.
- Connect Hoses: Carefully unscrew the caps from the purge port valves. You might hear a little pressure release. Attach one of your hoses to the cold-water purge port and the other hose to the hot-water purge port.
- Set Up Circulation: Place your submersible pump inside the 5-gallon bucket. Connect the other end of the hose from the cold-water port to the pump’s outlet. Place the other end of the hose from the hot-water port into the bucket, just letting it hang there.
- Add Solution: Pour your white vinegar or descaling solution into the bucket, making sure the pump is fully submerged.
- Circulate: Now, open the small T-shaped handles on both the hot and cold purge port valves. Plug in the pump. The pump will push the vinegar solution into the cold port, through the tankless heater’s heat exchanger (dissolving the scale), and out the hot port back into the bucket. Let this circulate for at least 45 to 60 minutes.
- Flush with Fresh Water: After an hour, unplug the pump. Close the hot-side purge port valve. Disconnect the hose from the cold-side port and close that valve. Now, open the main cold water valve (the one with the blue handle). This will send fresh water rushing through the unit, flushing out the vinegar and any loosened scale through the hot-side hose still in the bucket. Let it flush for a good 5 to 10 minutes.
- Reconnect: Close the main cold water valve again. Close the hot-side purge port valve. Remove both hoses and screw the caps back on securely. Finally, open both the main hot and cold water valves (turn them parallel to the pipes). Restore power and gas to the unit. The descaling is complete.
Special Cases: RVs, Basements, and Winterizing
Not every water heater is in a convenient garage with a nearby floor drain. Here’s how to handle a few common special situations.
Draining an RV Water Heater
Draining your RV’s water heater is absolutely essential, especially for winterizing. Leaving water in the tank during freezing weather will cause it to expand and crack the tank, leading to an expensive replacement.
The process is simpler than in a house:
- Turn off the water pump and disconnect from any city water hookups. Turn off the propane and electric power to the water heater.
- Open a hot water faucet inside the RV to relieve any pressure in the system.
- Go outside to the water heater access panel. Open the pressure relief valve at the top of the tank to let air in.
- Using a wrench or socket (often a 1-1/16 inch socket), slowly remove the drain plug at the bottom of the tank. Water will gush out. Be aware that on many RVs, this drain plug is also the anode rod, a metal rod designed to corrode instead of your tank. If it’s severely corroded or looks like a thin wire, you should replace it.
- Once the tank is empty, you can replace the drain plug. If you’re winterizing, you would now proceed with bypassing the heater and adding RV antifreeze to your plumbing lines.
Draining a Water Heater Without a Floor Drain (e.g., in a Basement)
This is a common problem when the water heater is located in a basement or closet with no drain nearby. You have to get the water from the bottom of the tank up and out.
- Method 1: The Transfer Pump. The best and fastest way is to use a small electric utility pump, also called a transfer pump. You’ll connect your garden hose to the water heater’s drain valve as usual. Connect the other end of that hose to the inlet of the transfer pump. Then, attach a second hose to the pump’s outlet and run that hose to a utility sink, a toilet, or out a basement window. Open the drain valve, turn on the pump, and it will pull the water out of the tank and push it wherever you need it to go.
- Method 2: The Wet/Dry Vacuum. If you don’t have a pump, you can use a large wet/dry vacuum, but it’s a slow and tedious process. You’ll need a short hose on the drain valve. Drain water into the vacuum canister until it’s almost full. Close the drain valve, haul the vacuum to a drain to empty it, and repeat the process until the tank is empty. For a 40-gallon tank, you may have to do this 8-10 times.
Part 3: Troubleshooting Common Draining Problems
“Help! My Water Heater Won’t Drain.”
You’ve followed the steps, opened the valve, and… nothing. Or maybe just a slow trickle. Don’t panic. As a plumber for 20 years, I’ve stood in front of a stubborn tank hundreds of times. Let’s walk through the likely causes and how to fix them safely. Usually, it’s one of three simple things.
Homeowner Self-Diagnostic Flowchart
Before you start taking things apart, run through this quick mental checklist. It’s the same process I use on a service call.
- Is a hot water faucet open somewhere in the house?
- No: This is the most common reason. A vacuum has formed in the tank, holding the water in. Go open a hot water tap fully and see if the flow starts.
- Yes: Proceed to the next question.
- Is the drain valve fully open?
- No: Some plastic valves with screwdriver slots can be tricky. Make sure the slot is vertical (in line with the flow of water). If it has a handle, make sure it’s turned all the way counter-clockwise.
- Yes: The problem is likely a clog. Proceed to the next section.
Top 3 Reasons a Tank Won’t Drain
- Vacuum Lock (Most Common/Easiest Fix): As mentioned above, if air can’t get into the tank, water can’t get out. It’s like putting your finger over the top of a straw full of water. The solution is always to open a hot water faucet inside the house. This breaks the vacuum and allows gravity to do its job.
- Clogged Drain Valve (Very Common): This is the biggest point of failure, especially with the cheap plastic valves that come standard on most heaters. Over time, chunks of sediment, rust, or pieces of a deteriorating anode rod can get lodged in the valve’s small opening, creating a blockage. The very stuff you’re trying to drain out is now plugging the drain.
- Severe Sediment Blockage: In older, long-neglected tanks, the sediment layer can be inches thick and as hard as concrete. This solid mass can physically block the drain valve’s inlet from inside the tank, so even if the valve itself is clear, no water can get to it.
How to Safely Unclog a Drain Valve
If you suspect a clog, here are a few professional tricks you can try. Safety first: make sure the cold water supply is off and the tank has had time to cool before attempting these.
- Method 1 (Back-flushing): This is often the most effective method. You’ll need a second hose, like a washing machine supply line. Close the drain valve on the water heater. Connect one end of the second hose to the drain valve and the other end to an outdoor spigot or utility sink faucet. With the drain valve still closed, turn on the spigot for about 15 seconds. This sends a high-pressure blast of water backward through the drain valve, which can dislodge the clog and push it back into the tank. Turn off the spigot, disconnect the back-flush hose, reconnect your drain hose, and try draining again.
- Method 2 (Probing): With the drain hose disconnected, briefly open the drain valve. If only a trickle comes out, you can try carefully inserting a stiff piece of wire (like a straightened wire coat hanger) into the valve opening and gently wiggling it around. This can break up a soft clog right at the opening. Be prepared for a sudden gush of water if you succeed.
- Method 3 (The “Stomp”): This is a last-ditch effort that sometimes works. With the drain hose attached and the valve open, firmly stomp on the hose about two feet away from the tank. This action sends a pressure wave, like a small water hammer, back into the valve, which can sometimes be enough to jolt the clog loose.
“Why Is My Water Heater Draining So Slowly?”
Patience is key, but sometimes a slow drain is a sign of a problem. Here are the main factors that affect how long it takes to drain your tank.
- Tank Size: This is the most obvious factor. A larger tank simply holds more water and will take longer to empty than a smaller one.
- Sediment Level: A partial clog in the drain valve or a thick layer of sediment at the bottom of the tank will restrict the flow and significantly slow down the process. A slow drain is often the first sign of a future total clog.
- Hose Diameter and Length: Using a narrow-diameter hose or an exceptionally long one (like 100 feet) will increase friction and reduce the flow rate. A standard 5/8-inch garden hose of 25 feet or less is ideal.
To help you know what’s normal, here are some typical drain times for a clean water heater under ideal conditions. If yours is taking significantly longer, you likely have a partial sediment blockage.
| Tank Capacity (Gallons) | Estimated Drain Time |
| 40 Gallons | 10–15 minutes |
| 50 Gallons | 15–20 minutes |
| 80 Gallons | 25–40 minutes |
Export to Sheets
“My Water Heater is Leaking from the Drain Valve.”
A dripping drain valve is a nuisance that can lead to water damage and mold if ignored. First, confirm the water is coming directly from the valve itself and not dripping down from the T&P relief valve pipe above it or from a seam at the bottom of the tank, which would indicate a much more serious problem.
- Common Causes:
- After flushing, a small piece of sediment can get caught in the valve’s seal, preventing it from closing completely.
- On older plastic valves, the internal rubber gasket or washer has simply worn out and failed.
- The plastic body of the valve itself can develop a hairline crack from age and heat, especially after being turned for the first time in years.
- The Quick, Temporary Fix: If you have a slow drip coming from the hose connection threads, you can buy a simple brass garden hose cap with a rubber washer inside from any hardware store. Screw this cap tightly onto the drain valve’s threads. This can often stop a small leak and buy you some time, but it should be considered a temporary band-aid, not a permanent repair.
- The Permanent Fix: The only right way to fix a leaking drain valve is to replace it. This is a common and relatively easy repair that not only solves the leak but also gives you a chance to upgrade to a much better quality valve, which we’ll cover next
Part 4: Drain Valves, Parts, and Professional Services
The Complete Guide to Water Heater Drain Valves
The drain valve seems like a minor part, but it’s the source of many frustrations. Understanding the difference between the cheap part the manufacturer gives you and a proper professional-grade part is key to making this maintenance task easier for years to come.
Plastic vs. Brass Drain Valves: An Honest Comparison
When you buy a new water heater, it almost always comes with a cheap plastic drain valve. Manufacturers use them to save a few dollars on production costs, but these valves are the root cause of most draining problems. They are prone to cracking, their small internal openings clog easily with the very sediment they’re supposed to be removing, and the screwdriver slots can strip or break, making them impossible to open.
For years, professionals have known the best practice is to immediately replace this plastic valve with a full-port brass ball valve assembly. This isn’t an upsell; it’s a permanent solution to a flawed design. A “full-port” valve means the opening through the valve is the same diameter as the pipe—a full 3/4 inch. This allows water and, more importantly, chunky sediment to flush out easily without clogging.
This is a perfect example of the “Basic Fix vs. Honest Fix” standard we follow. The manufacturer provides the bare minimum part to get by. The honest, long-term fix is to install a part that actually does the job right.
| Feature | Standard Plastic Valve | Full-Port Brass Ball Valve |
| Durability | Prone to cracking and breaking with age and heat. | Highly durable solid brass construction that lasts for years. |
| Flow Rate | Very small internal opening (often < 1/2 inch) that clogs easily. | Full 3/4 inch opening allows for fast draining and easy flushing of large sediment. |
| Ease of Use | Often requires a screwdriver; can be stiff and difficult to turn. | Easy-to-operate quarter-turn handle provides clear on/off control. |
| Reliability | Gaskets can fail, causing leaks. Prone to getting stuck. | Reliable, leak-proof seal. Will not get stuck or clogged. |
| Cost | Very inexpensive (why manufacturers use them). | Higher initial cost ($15-$25 for parts) but saves on future frustrations and repairs. |
Export to Sheets
How to Replace a Water Heater Drain Valve (Step-by-Step)
Upgrading your drain valve is a great DIY project that will make all future maintenance easier.
- Parts List: To do this the professional way, you’ll need three items from the plumbing aisle, all in 3/4-inch size:
- A 3-inch long brass nipple
- A full-port brass ball valve
- A male-threaded hose adapter
- A roll of Teflon tape (also called pipe thread seal tape)
- Procedure:
- Drain the Tank: First, you must completely drain the water heater. Follow the full procedure in Part 2 of this guide for your gas or electric model. You cannot replace the valve on a full tank.
- Remove the Old Valve: Using a pipe wrench or large adjustable pliers, turn the old plastic drain valve counter-clockwise to unscrew it from the tank. Have a bucket ready to catch any remaining water. If the plastic valve is old, it might snap off. If this happens, you’ll need a special tool called an internal pipe wrench or nipple extractor to remove the broken threads from the tank opening.
- Assemble the New Valve: Wrap the threads on both ends of the brass nipple with 3-4 layers of Teflon tape in a clockwise direction. Screw the ball valve onto one end of the nipple and the hose adapter into the other end of the ball valve. Tighten them with a wrench until they are snug.
- Install the New Assembly: Apply Teflon tape to the threads of the nipple that will go into the tank. Screw the entire assembly into the water heater’s drain opening. Tighten it with a wrench until the valve is secure and pointing in a convenient direction (usually downward or to the side).
- Refill the Tank: Make sure the new ball valve is in the closed position (the handle should be perpendicular to the pipe). Follow the steps in Part 2 to refill your tank, purge the air, and restore power or gas.
How to Open a Stuck Plastic Drain Valve
Many plastic valves, especially on A.O. Smith models, use a concentric design where you attach a hose and then turn a larger ring to open it. These can seize up over time. If the screwdriver-slot type is stuck, you can try gently using a pair of pliers on the outside of the valve stem for extra leverage, but be very careful. Applying too much force can easily snap the old, brittle plastic, turning a simple drain job into a valve replacement.
Brand-Specific Draining Guides (Rheem, A.O. Smith, Bradford White)
While the general process is the same for all brands, here are a few notes based on official documentation and common user experiences for the major manufacturers.
- Rheem: Rheem’s official manuals provide clear, step-by-step instructions for draining. They sell both plastic and brass OEM replacement drain valves, acknowledging that both are used across their models. A common issue reported by users is a slow drain rate, often due to a vacuum lock, reinforcing the importance of opening a hot water faucet to let air in.
- A.O. Smith: A.O. Smith’s online support center offers detailed guides for draining and flushing. Many of their models use the plastic, concentric-style drain valve that can be difficult to turn if it hasn’t been used in a while. Videos of users draining these units show that a good flush often releases a significant amount of dark, particle-filled sediment, highlighting the need for regular maintenance.
- Bradford White: Bradford White strongly emphasizes that maintenance should be performed by a qualified plumbing professional. Their “For The Pro” technical documents provide instructions that are consistent with the standard process, including shutting off the power/gas and water supply, connecting a hose, and opening the T&P valve to vent. Their official stance reinforces the idea that if you are at all uncomfortable with the process, it’s best to call for service.
The Honest Fix Pricing Guide: What Does It Cost to Have a Pro Flush Your Water Heater?
Sometimes, it’s just easier, safer, or smarter to call a professional. But what’s a fair price? Let’s break it down so you can hire a pro with confidence.
National Averages
Based on industry data, the cost for a professional to perform a standard drain and flush on a tank-style water heater typically ranges from $110 to $200.
For a tankless water heater, which requires a more involved descaling process with a pump and solution, the cost is higher, generally ranging from $150 to $250.
Factors Influencing Cost
- Plumber’s Rate: Labor is the biggest factor. Plumbers’ hourly rates can range from $45 for an apprentice to over $200 for a master plumber in a high-cost area. A standard flush usually takes about an hour of labor.
- Tank Size: A larger 80-gallon tank takes longer to drain and refill than a 40-gallon tank, which can increase the labor time and cost.
- Accessibility: If your water heater is in a tight closet or a difficult-to-access crawl space, the plumber may charge more for the extra time and effort required.
- Scope of Work: Is the service just a simple drain, or is it a full maintenance check-up? This brings up the most important point when hiring a pro: knowing exactly what you’re paying for.
Basic Fix vs. The Honest Fix Standard
Not all “flushing” services are created equal. The cheapest option might just be a “drain and run,” where a technician simply drains the water and leaves. A true professional maintenance visit—the Honest Fix standard—is a comprehensive check-up designed to improve efficiency and spot problems before they become emergencies.
| Task | The “Cheapest” Option | The “Honest Fix” Standard |
| Draining | Drains water from the tank. | Drains water from the tank. |
| Flushing | May not be performed. | Power-flushes the tank with fresh water until it runs clear to remove all possible sediment. |
| Drain Valve Check | Not checked. | Inspects the drain valve for leaks or cracks. Recommends an upgrade to a brass ball valve if a plastic one is present. |
| T&P Valve Test | Not checked. | Tests the Temperature & Pressure relief valve to ensure this critical safety feature is working correctly. |
| Anode Rod Inspection | Not checked. | For an additional charge, can pull and inspect the sacrificial anode rod and advise on its condition, which is the key to tank longevity. |
| Final System Check | Restarts the unit. | Checks for proper burner/element operation, looks for any signs of leaks, and ensures the unit is running safely and efficiently. |
| Warranty | Usually no warranty on labor. | We stand behind our work. Your satisfaction is 100% guaranteed. |
Export to Sheets
When you hire a pro, you’re not just paying for the 30 minutes it takes to drain the water. You’re paying for their expertise, their tools, and the peace of mind that comes from knowing the job was done right. A thorough maintenance visit can save you from a much more expensive emergency call down the road. If you’re in the Steubenville, OH, and Weirton, WV, area and it’s time to consider a replacement, give us a call at Honest Fix for a free exact quote on a new water heater. We do things the thorough way, never the fast way, because that’s how you build trust and keep your home running smoothly.
Alex Largent is the Owner and Senior HVAC Efficiency Analyst at Honest Fix Heating, Cooling & Plumbing. With more than 20 years of field experience, NATE and EPA certifications, and a hands-on leadership style, Alex teaches his team to fix systems right the first time — with transparency, precision, and no upsells. He writes about HVAC diagnostics, home energy efficiency, and practical maintenance advice for homeowners across the Upper Ohio Valley. Read Alex Largent’s full bio to learn more about his expertise in the HVAC and Plumbing industry. Updated October 2025.

