INSTALLATION STANDARDS · FLEXIBLE DUCTWORK

How Honest Fix Installs Flexible Ductwork

Flexible duct is fast to run and easy to run badly. Kinked, crushed, or pulled loose, it chokes the airflow your whole system depends on, and none of it shows once the crawlspace is closed up. Honest Fix installs every run of flex to a written standard: supported, pulled tight, bent wide, and sealed at both layers. This page is that standard, published in full, so you can hold any contractor to it. Ours included.

Published from our Installation Handbook · Reviewed by Alex Largent · 100% satisfaction, no exceptions 

THE HONEST FIX FLEX DUCT STANDARD

Four Things a Flex Run Has to Get Right

Flexible duct is the part of an installation most likely to be rushed, because it is quick to pull and it is buried in a crawlspace or an attic where nobody looks again. Done right, you never think about it. Done wrong, you feel it in every room that never quite gets comfortable. Here is what Honest Fix requires on every run of flex. You are welcome to check yours against it. 

Support and routing

Every run of flex hangs from a support no more than six feet apart, on a wide, nonabrasive mesh strap that will not cut into the liner over time. It runs level, as close to the joists as the space allows, and at least four inches off a crawlspace floor so it never sits in standing water or dirt.
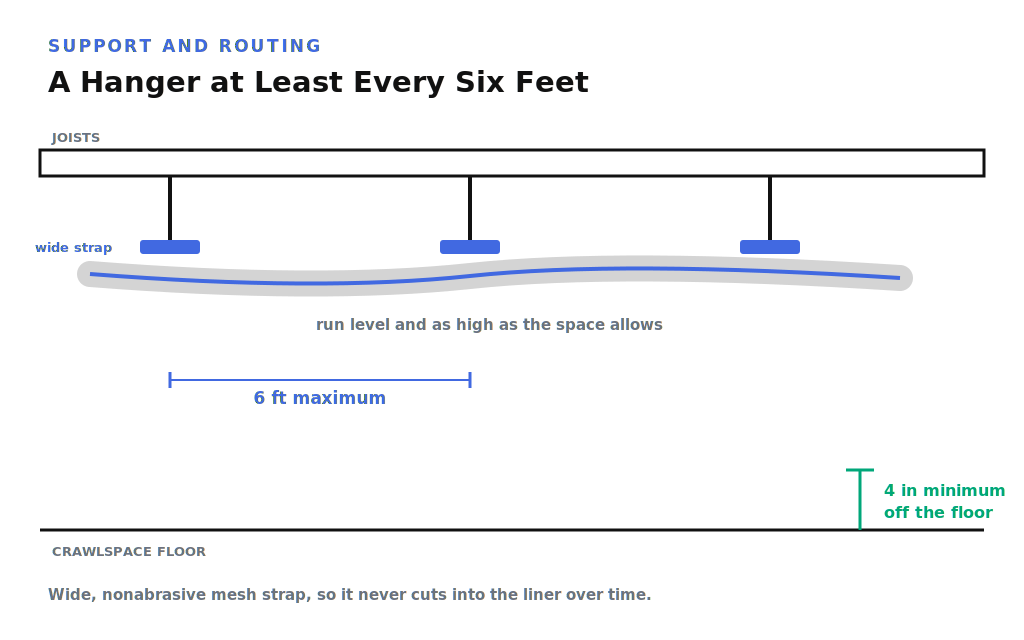
Diagram showing flexible duct supported by a wide nonabrasive strap at least every six feet, run level and as high as the space allows.

Bends and compression

Flex is pulled tight and left compressed no more than twenty percent, because a loose, baggy run adds friction the blower has to fight. Bends are kept wide, with a bend radius no tighter than one and a half times the radius of the duct, and no kinks, crushes, or short-radius turns. Where a tight turn cannot be avoided, a metal elbow makes it instead of the flex.
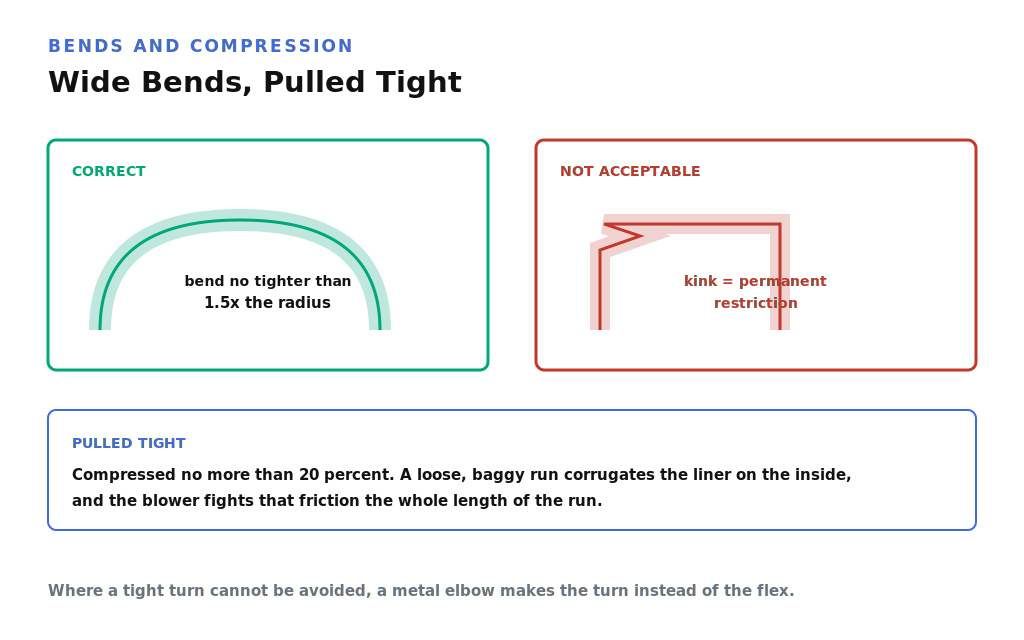
Diagram comparing a correct flexible duct bend, no tighter than one and a half times the radius, against a kinked bend, with the twenty percent compression limit noted.

The connection to the metal duct

This is the part that leaks when it is rushed. The inner liner is fastened to the metal fitting with a pan tie, tightened with the proper tool, screwed to the fitting, and sealed with metal tape, so conditioned air cannot escape into the crawlspace before it reaches your room. See the full sequence below.
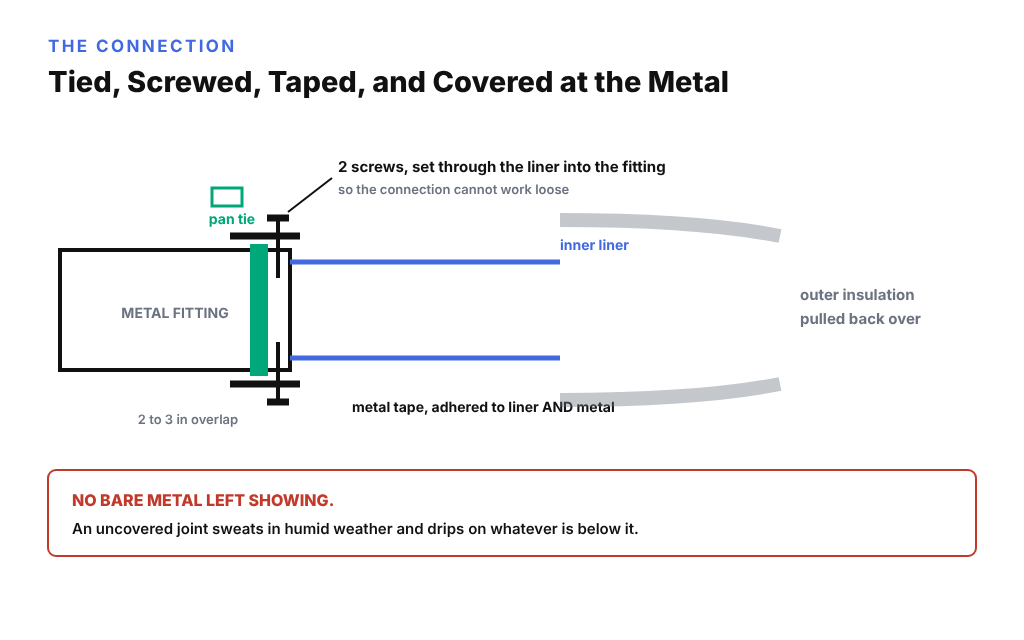
Diagram of a flex duct connection to a metal fitting, showing the inner liner tied with a pan tie, set with two screws, sealed with metal tape, and covered by the outer insulation so no bare metal shows.

The flex-to-metal connection, step by step

Every flex-to-metal connection is made the same way, every time.

  1. Peel the outer layer and insulation back to reveal the inner liner.
  2. Cut the inner liner back far enough that the outer layer will end up insulating and covering the bare metal fitting.
  3. Attach the inner liner to the metal fitting with a pan tie, with a two-to-three-inch overlap onto the fitting, centered and tightened with the pan tie tool.
  4. Set two screws through the liner into the metal fitting, so the connection cannot work loose.
  5. Seal the liner to the metal with duct tape, adhering to both the liner and the metal.
  6. Cover all exposed sheet metal with insulation and secure it with a pan tie, leaving no bare metal showing.

Sealing and insulation

The outer insulation and vapor jacket are pulled back over the joint and tied off, leaving no bare metal exposed to sweat and drip. Every takeoff, elbow, and metal connection is insulated, and a metal elbow is used at each supply boot to keep static pressure down where the air enters your room.
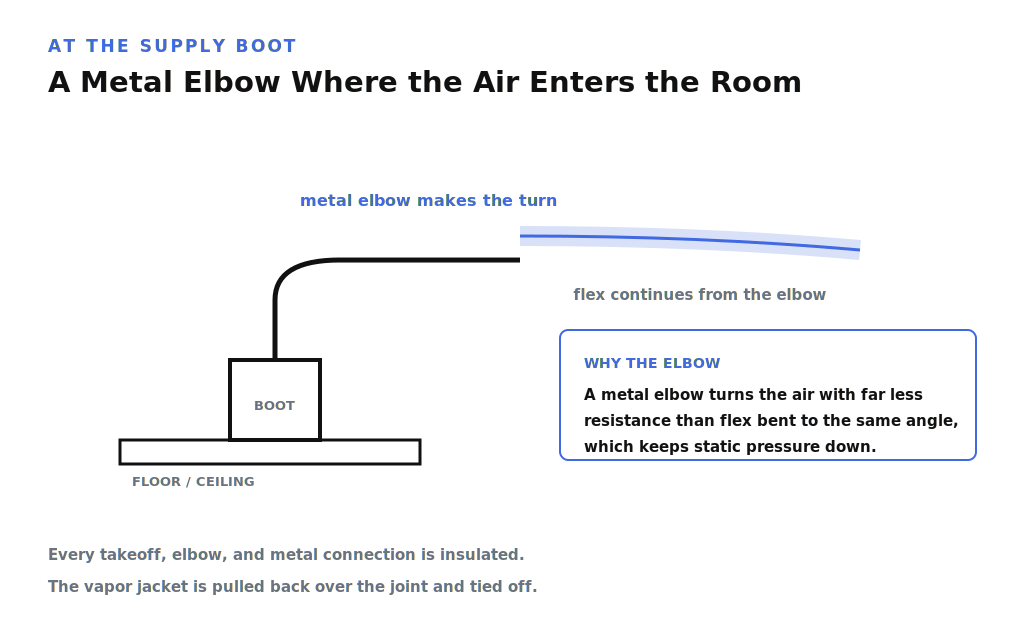
Diagram of a supply boot where a metal elbow makes the turn and the flex continues from the elbow, which keeps static pressure down, with a note that every takeoff, elbow, and metal connection is insulated.
WHY THIS ONE MATTERS HERE

You Paid for the Airflow, Not the Ductwork

A system is only as good as the air it can actually move. When flex is installed badly, the equipment is fine and the comfort is not, and it is the hardest kind of problem to diagnose because the damage is sealed inside a crawlspace wall. 

A kink is a permanent restriction

A single crushed or short-radius bend chokes the airflow to every room downstream of it, and it never fixes itself. 

A sagging run traps air and dust

Unsupported flex droops between hangers, and every low spot becomes a pocket that slows the air and collects debris. 

A loose connection leaks your money

An inner liner that was taped but not tied and screwed works loose over time, and the conditioned air you paid for leaks into the crawlspace instead of your room. 

Bare metal sweats and drips

A joint left without its insulation pulled back over it sweats in humid weather, and that drip lands on whatever is below it, season after season. 

Field conditions. Final installation details may vary based on manufacturer requirements, local code, home conditions, equipment model, safety constraints, and the written scope of work. Where the manufacturer's instructions and this standard disagree, the manufacturer's instructions win, and your technician follows them. 

FLEXIBLE DUCTWORK

Common Questions

Is flexible duct worse than metal duct?

How far apart should flex duct be supported?

Can flexible duct be bent around a corner?

Why does my flex duct sag in the crawlspace?

Why are some of my rooms never comfortable?

Should flexible duct be pulled tight, or is a little slack fine?

How do I know my flex duct was installed right?

Last Updated: November 12th, 2026

Go Look at Your Runs

Now you know what a correct flex run looks like. If yours sags, kinks, or shows bare metal at the fittings, that is worth catching before it quietly costs you a season of comfort. Honest Fix will come out, look at what you have, and tell you plainly where it stands. No upsells, no games. 

Metal duct standards · Duct insulation · The full Installation Standard

Honest Fix service van parked outside a home in Steubenville, OH.